Archive
1958 Lakewood Canned Ham
SOLD THIS GEM BACK IN 2018 I THINK IT WAS
After looking at a few around Phoenix, then down to Tucson, back to Phoenix, and off to Lake Havasu City we finally ended up with our first camper, a 1959 Lakewood Canned Ham. It was August of 2014 and I swear it must have been 130 in Lake Havasu city but it was late in the day so we decided to pull it home with the Murano. It was a long day to say the least but well worth it in the end. From what my memory serves me the camper was owned by the previous family for 16 or 17 years and always kept under a carport. But now with the kids in their mid 20’s the owner said he didn’t use it much.
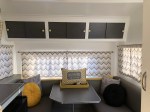
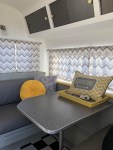
Our original intention was to just use it. But it didn’t take long and Tammy thought it should be painted white inside to feel larger and she was right. I’m glad we did go to the extra work of replacing some of the sidewall paneling and inside roof, adding a 120V system, replacing the icebox with a 120V fridge, and things like that. She was right in that it feels much better with the white inside and overall it turned out awesome.
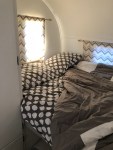
One of the things I really liked was how we raised up the bed so Dixie would have enough room for her dog bed underneath and always out of the way. Plus for when it was cool enough we lined it with pegboared so we could leave the outside storage hatch open and she could get some more fresh air down there.
At 15′ there really wasn’t enough room to add a toilet in and we haven’t needed one yet. My plan was if we were going to camp someplace without restrooms was to buy a popup enclosure for a porta potty to put outside. https://www.amazon.com/Portable-Camping-Toilet-Changing-Outdoor/dp/B00AZ0ZO56
There is also about 18″ or 19″ of height in the area below the bed to store one also.
The water system I added a pressurized inlet and a faucet at the sink for it. It also has the original fresh water tank and the hand pump faucet.
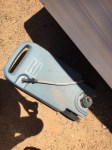
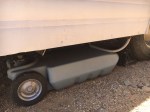
The greywater system uses a wheeled tank that fits under the camper once you park it. Some pictures of the tank are in the pictures below.
The 120V system uses the standard 30Amp twist lock connector and has outlets for the refrigerator as well as 2 outlets on the wall. It is connected to a WYCO converter that also charges the 12V battery.
The 12V battery runs the 2 LED lights and the Fantastic ceiling fan.
The propane system is connected to the stove and burners and also has a second backup tank that you can use to connect to a propane grill also.
The camper uses a 2″ ball and has a 7 wire hookup since it is also setup for electric trailer brakes which work.
I’ll include our Craigslist Ad with more information below the pictures and video.
Here’s some pictures of it from June 2018.


Here’s a little video I made of it also.
And here’s the Craigslist ad when we decided to sell it since I’m tearing into the 1974 28′ Silver Streak.
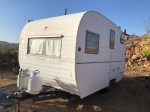
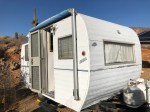
This is a lovingly restored and modernized 15′ long 1958 Lakewood Canned Ham Camper. It’s ready to go Glamping this weekend and is looking for a new home that will enjoy it even more than we did. The owner we had purchased it from had it for 16 or 17 years and we have now owned if for almost 4 years and did most of the remodeling in late 2014 and early 2015.
The canned hams were one of the coolest designed campers of all time. So cool that they have started making retro ones with the similar curved design. This one does have the Shasta Wings on it that the previous owner had mounted but it is a Lakewood, NOT a Shasta.
We had lots of fun remodeling it and everyone who has been in it loves how well it turned out and how spacious it feels for a 15′ camper.
It has a very comfortable bed in the back that is about 48″x78″ and the front dinette can make into a bed that is about 38″x72″. The interior height is 6′-1 to the bottom of the supports going across the width. All of the windows are functional and seal well. There are no water leaks that we know about. Lights work and it uses a 2″ hitch ball and it does have electric brakes that work.
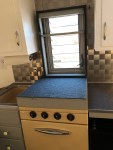
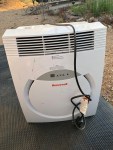
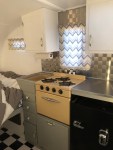
The kitchen area has a new fridge, original sink, and the original propane stove and burners. It also comes with a removable portable air conditioner that can sit on top of the stove and vents out through the window when you need it.
There is ample amounts of storage in the closest, cabinets, as well as under the front dinette seats. It also does not have a grey water tank built in but it does have an external wheeled water tank that sits under the camper. It actually is nice because you don’t have to wait in line for the RV dump.
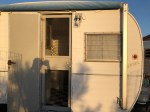
Also has a blue retractable awning.
It DOES NOT have a toilet.
I’m not sure on the weight of it. We have towed it with our 2006 Nissan Murano to San Diego and back.
Just a few of the things we replaced in 2014-2015 when we restored it.
1.) Replaced tires.
2.) Repacked bearings with new seals.
3.) Electric brakes functional with safety break away switch.
4.) Had Cliff’s Welding add additional tubing to stiffen up trailer tongue.
5.) Added stabilizing jacks on all 4 corners.
6.) Added a Fantastic vent with thermostat control.
7.) Added AC refrigerator to replace old icebox.
8.) Added a 12 volt battery, power converter, and 120 volt wiring with breakers.
9.) Added a 120 volt outlet with USB charging ports built in.
10.) Added 12 volt power outlet inside.
11.) Replaced all interior lighting with LED.
12.) Repainted interior a bright white which really made it feel larger and look more modern. Also painted the inside of the cabinets and closet.
13.) Recovered the dinette cushions.
14.) Built the bed up higher so we had a nice spot below for our dogs bed. She is 60 lbs and loved her little spot.
15.) Made new curtains.
16.) Added a dual propane tank holder to the front so we had 1 for our gas grill.
17.) Plumbed in a fresh water hookup to a hose. We did leave the original water tank in under the bed and do have the original hand pump faucet, I just never got around to hooking it up since we had never needed it.
18.) Replaced some of the paneling and added some Styrofoam insulation but we did not take the entire camper down to the studs since most of the paneling showed no signs of water damage.
19.) Recovered the table, counter tops, and front cabinet doors in a vintage looking boomerang laminate.
20.) For AC I found a portable unit that fits on top of the stove and vents out through the window for the times that we needed it. We didn’t want to put a rooftop unit on it and ruin the vintage looks of the canned ham.
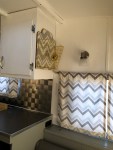
21.) Added a stainless steel looking backsplash.
22.) We recently replaced the flooring with a checkerboard vinyl sheet flooring.
What’s left for you to do is to repaint or wrap the outside if you want to your liking.
We’re hoping she finds a good home that will have time to take her one even more adventures than we did.
